How To Remove Window Film Like a Pro
Window films serve a variety of purposes. These tinted films protect you from heat and UV rays, give you privacy, and add an aesthetic element to your home for a warmer, more welcoming vibe.
However, window films need to be replaced after a while as they undergo natural wear and tear due to aging, the weather, and outdoor elements like dust, cold, and heat. They can lose their color, smoothness, and protective features over time. These protective layers may also need changing if your home renovations involve replacing your windows.
To learn how to remove window film like a pro, read on!
Why Window Films Are Important
Just because you’ve decided to spend the day inside doesn’t mean that you’re safe from heat and UV exposure. Untinted windows or windows with weathered films can’t filter out the sun’s harmful rays. This could take its toll on your skin, resulting in premature aging, sun spots, sunburn, and even skin diseases.
To recap, here are some of the risks you face from exposing yourself to UV rays:
- Skin damage including increased risk of skin cancer because of DNA damage
- Eye damage including macular degeneration and cataracts
- Weaker immune system
Unblocked UV freely entering your home can also cause damage to fabrics and surfaces like curtains, sheets, rugs, wood furniture, or paintings (photodegradation).
When your window films are no longer in pristine condition, take action before your comfort, style, and wellness suffer. Tending to this small home detail allows you to care for your home and yourself. So, check for signs that it’s time to replace your window films and arrange to have new ones installed if necessary.
Signs That You Need To Remove and Change Your Window Films ASAP
You’ll know that your windows films need changing when you notice:
Bubbling or Warping
Bubbling happens when the adhesive strength of your window film is failing or if it wasn’t installed correctly. This results in air pockets getting trapped between the film and the window, producing bubbles or blisters.
If unaddressed, small bubbles eventually become bigger, giving the film an unsightly warp or bumps. Larger bubbles and warping are harder to fix so it’s recommended to remove and change the window film when you first notice them.
Fading or Discoloration
Your window films’ tint will fade over time. Depending on the product quality and composition, some fade faster than others due to constant exposure to external elements like high heat, moisture, dirt, and the sun’s UV rays.
These lead to a breakdown of the film’s molecular structure, causing its color to fade. Faded window films lose their ability to block UV rays, minimize heat, and provide privacy so it’s important to replace them immediately.
Scratches
Window films are constantly exposed to environmental elements so it’s natural for their texture to weaken and become less glossy. Dirt, debris, and dust that come in contact with window films can cause friction and lead to scratches. Other causes of scratches include using abrasive cleaning materials, rough fabrics, and strong cleansers. The improper use of installation tools or mishandling can also lead to surface scratches.
Unsightly window films with scratches reduce your home’s appeal. Cleaning your windows may aggravate the problem because of friction so the best solution would be to replace the window films with new ones.
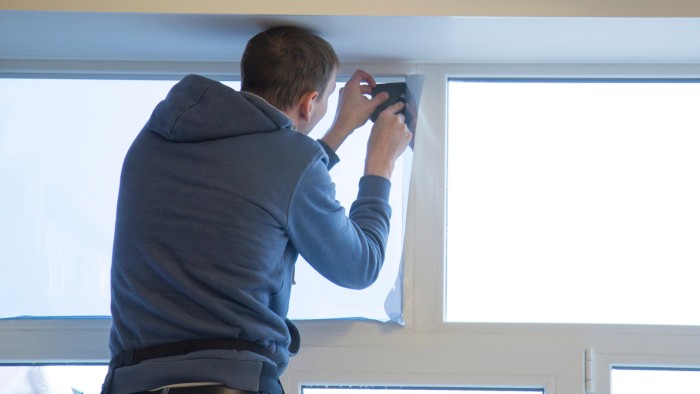
DIY Window Film Removal
Now, the tricky part is learning how to remove window film the right way. When it’s not properly done, you get residue or goo on your windows. You may also end up with sticky patches that are difficult to get rid of.
While you can always ask a professional to do it for you, you can also DIY it if you have the time, energy, and the right tools. It’s not rocket science and with the right techniques, you can remove your window films and their stubborn adhesive like a pro.
The easiest method is by melting or softening the adhesive by using heat or soapy water. The aim is to break the film down so that it’s easy to peel off.
Here’s how to remove window film:
Heat Method
You can use a variety of heat sources like a hair dryer or steam cleaner.
Hair Dryer
- Apply heat on the outer side of the window film, keeping the tool about 5 inches from the glass surface.
- Feel if the window is already warm, then slowly peel off the film starting at the corner.
- You may need to alternately heat and peel, making sure the film doesn’t stick back on the glass. Do this until you can peel off the entire film.
- Apply an adhesive remover and let it sit for about 10 minutes.
- Using a paper towel or cotton cloth, remove any adhesive residue. You can also use a small razor to gently scrape off any stubborn film or areas.
- Give it a final wipe using a microfiber towel or soft sponge for a clean window.
Hair dryers are an easy way to create heat on the surface, making window film removal easy and convenient.
Steam Cleaner
- Prepare your steamer with water, turn it on, and let it warm up until it starts creating steam.
- Apply heat on the window film starting from the corner by pointing the steam attachment close to the window.
- Keep applying heat until the film starts to loosen.
- Start peeling the film off with your fingernail carefully.
- Use a small razor to scrape off any hard-to-remove residue from the surface.
- Remove all remaining adhesives with an adhesive cleaner and a microfiber towel.
By using your steam cleaner to generate heat, you can slowly peel off the film on your window.
Soapy Water Method
- Make a small tab for easy lifting by cutting the corner of the window film.
- While holding the corner of the film, carefully peel it from the glass surface.
- Spray soapy water on the glass to soften the adhesive or any portions left.
- Using a razor blade, remove any remaining residue while being careful not to scratch the glass.
- Keep adding soapy water to loosen the adhesive.
- Wipe the surface using glass cleaner and a microfiber towel or soft sponge.
- Use a rubber squeegee or microfiber cloth to dry.
The soapy water makes the area between the window film and the glass slippery, allowing you to peel back the film little by little.
Window Film Care Tips
While natural wear and tear happen to all window films over time, you can prolong their quality and protective features by:
Using the Proper Cleaning Materials
Window films are prone to scratches so make sure to use proper cleansers and rags to clean them. We recommend using a microfiber cloth or soft sponge and gentle cleansers.
Avoid Ammonia-based Cleansers
Do not use ammonia for cleansing. Instead, you can use soap diluted in warm water or gentle cleansers that do not ruin the tint and texture.
Follow the Edges As You Clean
Wipe the film in the same direction as the edges or seams. Going against them as you scrub the film can accidentally lift the edges or corners.
Dry the Window After Cleaning
Moisture may seep through the edges or seams and become trapped between the film and the glass. So, make sure to wipe the window film dry after cleaning it with liquid.
Dust It off Gently
Gently remove dust and debris from the surface by using a microfiber cloth or a soft sponge to prevent ruining the texture and clarity of the film.
How To Choose a New Window Film
Maximize your window film’s aesthetic appeal and practical benefits by picking the right product.
Purchase Based on Your Purpose
If you are buying primarily for privacy, then your best options are mirrored or frosted films. These prevent people from looking into your home while still allowing you to see what’s going on outside.
If you’re buying films primarily to protect you from heat and ultraviolet rays, choose solar window films that have layers of UV protection, glare reduction, and heat insulation properties.
There are also decorative window films with stylish patterns that add more style and character to your home if aesthetics are your main goal.
Check Product Features
Ask about the film’s features and specs. Some window films have special properties like privacy, waterproofing, PVC-free cling, customizability, higher UV protection, glare reduction, heat reduction, shatterproof feature, insulation, and a variety of effects and designs.
Choose Easy-to-install Window Films
Opt for a window film with a straightforward installation and strong adhesive properties, especially if you’re planning to install it yourself. You can also choose adhesive-free static icing films that you can cut to size before installing.
Material Composition
Window films can be made from polyester, vinyl, or ceramic. Choose which material suits your home and your needs the best.
- Polyester is generally more affordable, durable, and has excellent UV-blocking capabilities.
- Vinyl is thicker and more resistant to scratching and fading. It’s also an effective heat insulator, making it ideal for colder climates.
- Ceramic also works well for blocking UV light while still allowing sunlight to pass through. It’s scratch-resistant and has a longer lifespan but is more expensive than other materials.
Before you replace your window film, it’s a good idea to think about the features you want it to have.
Window Films: Keeping Windows Pretty and Private
The best window film adds value to your home, health, and lifestyle. Feel protected and secure at home all the time with the right protective layer. With proper maintenance, it can shield you from unwanted elements while increasing your home’s aesthetic value and comfort!
Stick Pretty offers a wide variety of window films from window privacy films and tile stickers for bathrooms and kitchens. Visit our website to check out our functional and well-designed collections or give us a call at 888-667-6961 to learn more.
